Monday, December 31, 2012

Pizza Dough Recipe

I found this recipe awhile ago on http://onceamonthmom.com/homemade-pizza-dough/. The only change I made is using bread flour, but all-purpose works fine. It is wonderful! You can make garlic knots, breadsticks or pizza dough with it, and sometimes I add oregano or other spices to the dough for a different flavor.

Pizza Dough

650 mL (2 3/4 C.) Water, lukewarm
1 1/2 T. Active Dry Yeast
1 1/2 T. Salt
1 T. Sugar
1/4 C. Olive Oil
6 1/2 C. Bread Flour

Mix yeast, salt, sugar and oil in water, let sit for five minutes. Mix in flour without kneading, cover loosely. Leave at room temp for two hours or till doubled in size. Roll out with flour and use, or refrigerate, or let sit two more hours and freeze. Thaw before baking if frozen.

Bake at 450 degrees Fahrenheit for 15-20 minutes. Enjoy!


Sunday, December 30, 2012

White Bread (Bread Machine) 2 lb. Loaf

Delicious preservative and dough conditioner free bread! I try to use grams and milliliters when I measure for accuracy, but most recipes I have the cup conversions as well. This recipe is a bread machine recipe so it won't help you if you don't have one.


White Bread 2 lb. Loaf

1 3/8 C. (310 mL) Water, 100 degrees F
2 T. Olive Oil
4 C. Bread Flour
2 T. Sugar
2 T. Dry Milk
1 3/4 t. Salt
2 1/4 t. Active Dry Yeast

Add liquid ingredients to pan first, mix dry ingredients and add those, then make a well in center of the dry mix and put yeast in it. Place pan in bread machine and select white bread option.

*I like to premix the dry ingredients and put them in bags so all I have to do is dump the bag in instead of measuring all the items.

It stays fresh sealed at room temp for a couple days, but you can slice and freeze it too for up to a month. At my house it never makes it to the freezer though, there are fingers in it right after it's done baking. I also use it for breadcrumbs and croutons. Enjoy!

Saturday, December 22, 2012

Groceries for Less

  -->
How To Cut Unnecessary Spending From Your Grocery Budget

I feed (and clean) my family of four with $350 a month. This includes food, cleaning products, toilet paper, deodorant, razors, soap, etc. It doesn't include makeup (don't wear it), alcohol (don't buy often), or diapers/wipes. My youngest is only 3 months old so she is on breast milk, and my toddler gets some breast milk and some cow's milk. I buy organic apples, but pretty much conventional everything else. Soaps for the kids are chemical-free and run on average $9 a bottle (about 3 months). 

Depending on your circumstances it's definitely a good idea to evaluate what you could make yourself (certain things are time-consuming to make, but if you're home anyway it may be worth it to you). Most things aren't incredibly difficult to make, they just take time and generally the recipes require tweaking.


Something else I have learned is that if you have convenience foods around, you will eat them! It's just too easy to make freezer food when you're tired or busy with something else. The easiest way to still have your convenience foods and save money is to make your own convenience foods! Pizza, for example, I make the sauce in bulk, and freeze it in 1 cup portions. I make the dough the day we want pizza, but the recipe is doubled so while I'm making dinner, I make up some pizzas and freeze them or make a bunch of garlic knots/breadsticks for lunches later on. Way cheaper than buying frozen pizzas, and tastes so much better.


So here's a list of tips to trim your grocery/household expenses:

-Gradually decide what you can live without. Everyone buys things they don't really need. Pick a few unhealthy things each month to remove from your shopping list. Example: freezer meals or Cheetos. Not only are they preservative and calorie-dense, but they lack in nutrients too.

-If you don't pay attention to how much you spend at the grocery, simply looking over your receipts later and adding them up will show you how much you're wasting on impulse buys. Stores rely on impulse buys to make their money, and it takes a very strong willed person to escape those tactics.

-Limit your purchases of expensive or unnecessary items to a couple times a month, especially if they're unhealthy. Bacon is a good example, we all love it but it's usually more than $3 a package, and you don't even get a pound. There are much better cuts of meat for that price. 

-Buy generic! There are very few instances where the brand name is better than the store brand. If you prefer to pay for the advertising on the exact same product go right ahead, but it's a waste of your money.

-Plan your purchases. Make a list, and when you go in the store stick to it! If you have to impulse buy, set a limit. It also helps a lot to buy things in bulk when they're on sale. Milk is a good example, on sale it's about $1.50/gallon, but regular price it's at least $3. It goes on sale every other week. Staple foods commonly work this way, and by planning it right you can save more than 50% on the foods you buy regularly. 

-In accordance with planning shopping trips, going to different stores and buying their sale items is usually a cost savings as well. Usually each store will have a few really good deals each week. The trick is only buying the sale items and not the regular priced ones too. If you can put off buying an item until it is on sale, do it.

-I cannot stress how overpriced processed food is enough. You are just paying for convenience and preservatives. If you can make it yourself or do without it, you're saving your health and your money.

-Coupons! There are many aspects to this, but simply cutting coupons on things you buy already is a great way to cut costs. I save on average $30 a month using clipped and printed coupons. Your stores may send you personalized ones as well, and most have online coupons now that load directly to your card. 


-Don't go when you're hungry and if you can, go by yourself. Other people with you just mean more impulse buys and distractions.


I hope to write a post about all the different things you can premake soon. Some are worth the time and effort, others not so much.

Homemade Hamburger Helper

As many of you probably did, I had Hamburger Helper a lot growing up. I always liked it too, it was a completely thoughtless dinner to throw together in a hurry. However, after the birth of our son I began changing our diets, slowly, and now we eat almost no processed food whatsoever. Since our diets have improved, hubby's asthma has disappeared, and he used to need an inhaler multiple times per day. That's enough reason, but I want my kids to eat healthy too.

Photobucket
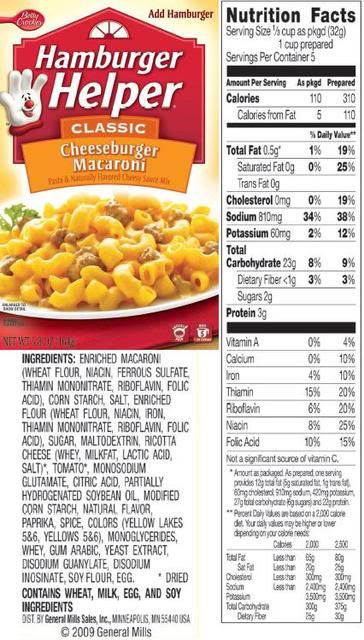
Scary Ingredient List...

I read the ingredients on the label of Betty's box, and decided I didn't want to feed my family MSG or partially hydrogenated oils (which are trans fats, even though the label says there is none) nor do I need my food to have at least three colors added. Plus the wiki page on disodium guanylate says asthmatics should avoid it, among other health concerns. As much as this makes me want to rant about why someone in the FDA isn't doing something to stop this, I'll probably get further by voting with my wallet. I threw out 5 boxes of it and haven't bought it since. However, making meals from scratch is time consuming, and with two kids now I need quick meals that are still healthy.

It seriously only takes 30 minutes, from start to finish. Just like the box crap. The flavor is amazing, so much better, and it reheats well too. Makes me wonder why it never occurred to me to make these myself to begin with. The basic Cheeseburger Macaroni I had everything on hand for, and I'm anxious to try to make a mexican rice version. You could even prepackage the ingredients in bags if you wanted and just throw it together.


The original blog I found with a recipe for cheeseburger mac is below my recipe, but I tweaked it and the recipe I ended up using follows.


Cheeseburger Macaroni 


1 lb. lean ground beef
1 t. sugar 
1 T. cornstarch
1 t. black pepper
1 t. onion powder
1 t. garlic powder
1 t. salt
2 t. paprika
2 c. milk
1 c. hot water
1 1/2 c. pasta
1-2 c. mexican shredded cheese (or cheddar)

Brown the beef, drain if necessary. Add hot water, milk, pasta and spices, bring to a boil. Reduce heat to simmer and cover, cook around 10-12 minutes or until pasta is tender. Add cheese and stir.

http://www.kitchenstewardship.com/2009/10/23/successful-hamburger-helper-substitute/


Cheesy Enchilada Style

Note: I took a picture of this but it just doesn't look very good...it is rice, beef and cheese after all...
However, it is absolutely delicious, especially spicy and on a flour tortilla!

1 lb. ground beef
1 c. rice
2 c. water
1/4 white onion
1 c. tomato sauce
1 T. chili powder
1 T. taco seasoning
1 T. garlic powder
1 t. oregano
1 t. red pepper
1/2 t. cayenne (opt.)
1 c. shredded mexican cheese

Brown beef, rinse to drain well (grease will interfere with the rice cooking). Add all remaining ingredients except cheese, cover and simmer 15-20 minutes. Taste and modify spices/add water if necessary. Also good with homemade tortilla chips.

This is my own recipe adapted from the HH version.


Beef Stroganoff

Adapted from many recipes online and trial and error.

1 lb. ground beef
1/4 white onion
3 c. milk
2 c. water
4 c. pasta (smaller style is preferable, we like rotini)
2 beef bouillon cubes (or Better than Bouillon paste)
2 t. paprika
2 t. garlic powder
1 t. pepper
1 T. Worcestershire*
1 T. cornstarch/dry milk powder
6 T. sour cream

Brown beef, drain if necessary. Add remaining ingredients except sour cream, cover and simmer 15-20 minutes. After pasta is done, thicken up sauce with cornstarch or dry milk powder. Add sour cream, mix and serve.

*We never use the Worcestershire because hubby won't touch it, but I think it would be a great addition for extra flavor.

So that's all for my Hamburger Helper knockoff recipes! Hope you enjoy them as much as we do!

Wednesday, December 19, 2012

Lollipops in 30 Minutes

Recipe for Lollipops/Hard Candy:
(from LorAnn's website, halved)

1/3 c. + 1 T. water
1/3 c. light corn syrup
1 c. granulated white sugar
1/4 t. flavoring oil

Other Supplies Needed:
Saucepan
Metal/silicone utensil
Candy molds (instructions on how to make your own below)
Candy thermometer (water test will work too)   

Directions:

(Prep molds, pour flavoring into measuring spoon, have coloring ready to be used).
  1. Add the sugar, corn syrup and water to pan, turn it on medium while stirring constantly till it is dissolved or starts to boil.
  2. Once boiling, stop stirring. Now is the time to clip on your thermometer if you don't have an infrared. You'll notice the mixture will go from rapid boiling (low 200's) to a slower boil as it gets thicker (around the 260's). You're just reducing it, and once the sugar saturation gets high enough the temperature will climb rapidly.
  3. When you see the thermometer reading 270 add your coloring. Just drop it in and let the boiling incorporate it. 
  4. If using a clip on style thermometer I would (carefully!) try to get a reading on the center of the mixture. When most of the mixture is 300 F, take the pan off the burner. Once the boiling stops stir in the flavoring and Tart & Sour (if using). Pour into a Pyrex, candy funnel or just hold the pan in one hand and use a large spoon to fill molds. Work quickly! This is the part that takes the most practice, as it cools it thickens, so fill small molds first. That's it! Let the candy cool, and fill the pan with warm water for easy clean up later. I usually scrape the excess candy out of the pan onto a spoon and let it harden.


Flavoring/Coloring
I like using LorAnn's candy making oils. It's $1.40 for a dram on their website, and using the recipe here it yields 4 batches of candy. One batch is about 15 suckers, but this really depends on your molds. You could theoretically use flavor extracts like those from the grocery, or even spices like cinnamon or ginger, but I have only tried the candy oils. My favorites are watermelon, strawberry-kiwi and pomegranate, and hubby loves cinnamon. There is also a product called Tart & Sour (citric acid) to be used with fruity flavors to make them sour. The cheap food coloring from the grocery worked better than my concentrated Ateco stuff, the gel types don't mix in as thoroughly.

Molds
Be sure to use the white molds made for candy making. Wilton sells clear ones but these are for chocolates, and they will melt under the heat, I have a few warped ones to prove it. The molds are about $2.50 each, I have bought some by LorAnn and some by CK Products. The CK molds have warped slightly and now do not lay flat, so I recommend only the LorAnn molds. If you don't have molds, it's super easy to make your own. Pour powdered sugar into a dish and use a round object to imprint circles into the sugar. Add sticks and hot candy, voila! Or, pour onto greased/sugared surface and score with a knife to make breakaway candies.

Candy Thermometer
Candy thermometers are cheap and easy to find at the grocery store, but I find them super annoying to use compared to our handy infrared thermometer (thanks to hubby for this one). Our infrared came from Harbor Freight and cost about $20, but it has proved to be invaluable in the kitchen for testing liquids. I wouldn't attempt candy making without a thermometer of some sort, whatever is used just make sure it's measuring the liquid and not the bottom of the pan. 

Saucepan/Utensils
I have used a hard anodized pan with success and also a stainless steel saucepan for my candy making. The stainless steel one is superior, it heats much more evenly and cleans up easier. Use either silicone or metal utensils, obviously plastic will melt but materials that aren't porous are best. A candy funnel is awesome too, but I just use my spoon, the funnels are $15-20 and I'm cheap :)


Tips and Tricks
    I have read that you must wash down the sugar crystals on the sides of the pan, but I have never done this and have not experienced any crystallization either. If you're using corn syrup, it shouldn't crystallizeIf you look closely in the pictures to the right I added heart sprinkles to one and star candies to the other. It's easy to add inclusions while the candy is still hot or place them in the mold before you pour.

    Cooking to 280 will leave the candy a little soft, and it sticks to your teeth. Hard crack stage is technically 300-310, but go too far over and it will start to caramelize and won't be as good. Using my infrared I take it off the burner when most of it has reached 300, the edges of the pan are still in the 290's. 
     
    In the LorAnn recipe it says to use a dram for a full batch, which would be ½ dram for the recipe I posted above. I use a little less than ¼ dram (¼ teaspoon) for the recipe above and for strong flavors like cinnamon I use an 1/8 teaspoon.